#26 Instagram (tips & tricks)
Thursday, 25 April 2013
Thursday, 25 April 2013

Anyone who knows me personally knows how much my iPhone means to me. It's what I use to stay connected with friends, be it through messaging or social media outlets. It's what I use to take photos with most of the time, to the point where I hardly use my Canon camera, that my dad got me for my 22nd birthday, anymore. I only bring the bad boy out when I'm travelling overseas. It's what I used to listen to my music with, until I decided to revive my iPod to spare the battery life on my iPhone. It's what keeps me company whenever I'm on the commute or waiting for people in public areas.
No surprises when I say that the application that I use the most on my iPhone is Instagram. Hence, I decided (quite a while back actually) that I wanted to do a post, covering some tips and tricks that I use when editing photos that I upload on Instagram. This is probably my LONGEST post ever, ha-ha.
Just a disclaimer, I'm not saying that my way works for everyone and that all my photos are AMAZING. I'm no expert photographer, I'm not even an amateur one. In fact, I often scroll through my photos and end up deleting a whole bunch of "what-was-I-thinking" photos at a go. Hell, I even deleted my previous account just because I had so many ridiculously rubbish photos that it would have been too exhausting to go delete them all one by one. This is just an entry of what I normally do to edit my photos, before pondering long and hard if they are nice enough to be uploaded onto Instagram (personal standards). I just felt like sharing it with whoever reads this space that's all :)
-▴▴▴-
[My Applications]


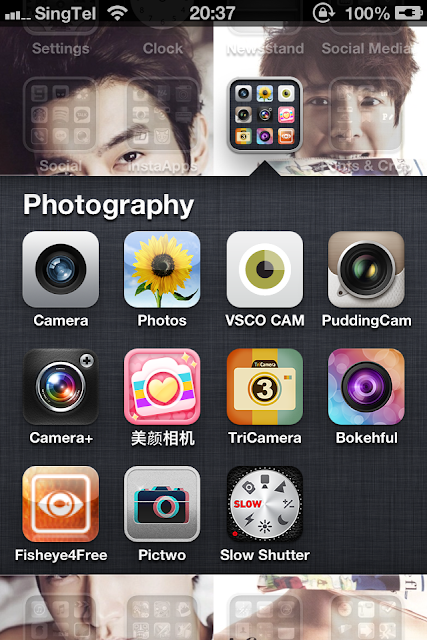

Yup, before I start proper on what I normally do with the photos I take, I figured I'd first introduce to everyone the applications that I have downloaded for photo-taking/editing. As you can clearly see from my iPhone dashboard, I'm SUPER OCD when it comes to arranging and categorising my applications. Sidetrack a bit, LOVING my wallpaper of #sihae, just saying.
Anyway, I have 3 separate folders for photo-taking/editing applications. One is for taking photos, one is for inserting words/quotes and cropping and one is for collages and last-step edits before uploading the picture onto Instagram. I deleted all the InstaPlace & InstaWeather & InstaFood applications because I rarely use them; plus I rather edit my photos with the other applications that I have.
Under InstaApps, I normally only use the first 2, occasionally using Diptic and Catwang. For the Photography folder, I normally only use the applications up till PuddingCam, occasionally filtering some of the photos with 美颜相机. As for the Fonts & Crop folder, I typically only use the first 4 applications.
-▴▴▴-
[Process]
So, what I'd normally do first is of course take a photo with either the normal, default camera or with the PuddingCam, only because you can't filter photos from your library with the PuddingCam; it has to be taken on the spot and then edited after (kind of troublesome, I know). However, I personally feel that it is kind of worth the trouble? Only because some of the filters available on the PuddingCam are really nice and it can give your photos that hipster effect or a dreamy effect, depending on your fancy.
(PuddingCam)


For the sake of illustrating what I mean, I've taken a couple of screen shots and test shots of my TOFUMAN (whom I've been seriously neglecting) using the various applications. PuddingCam allows you to choose from different filters as well as different types of camera lens. I normally use the first setting, Basic Lens and Vignetting Filter. But to show how it can produce a different kind of effect, I've also used the Snap Lens and Dazzle Filter. For the former, it has a semi-cross processed feel (in my opinion) while the latter has a softer, more whimsical or dreamy feel (again, in my opinion).
(VSCO)


Once you're done taking the picture of whatever it is that has caught your attention, the next thing I normally do is to edit the photo using the VSCO application. You can actually use the VSCO camera to take photos directly, FYI. There are 2 manners in which you can edit your photo on VSCO. You can choose from 1 of the 10 filters, 3 of which are Black and White and the other 7 are Coloured. You can also edit various aspects of the photos, such as the contrast, saturation, fill etc. Because I've already used PuddingCam to take my picture, I don't usually add another filter, so I will just directly edit the contrast, saturation etc. However, if you happen to take the picture with your default camera, I'd say that some of the filters on the VSCO application are quite nice.


After you're satisfied with whatever edits you have made, save and export the picture(s) into your camera roll. And ta-dah, we have the 2 finished products above. Just to re-cap, the 1st one is taken with the Basic Lens and Vignetting Filter while the 2nd one is taken with the Snap Lens and Dazzle Filter.
(symbolGram)


Now let's say, you don't want to upload the finished product immediately. You want to crop it, give it some shape, to make your photo more interesting, different, unique. The application I most often use to crop photos is symbolGram. I mean, unless of course I'm cropping the photo from a rectangle into a square, then I'd just use the normal, default editing tool that comes with the iPhone. There's actually a lot of options to choose from. Hence, depending on the subject matter that you're shooting with your iPhone, you can decided which shape you want to crop your photo into. I most commonly use the circle, I don't know why. I just feel it looks nice. But I've been wanting to try the triangle or 'x'; maybe one day when I happen to chance upon a nice sunset or scenic backdrop :)
(Whitagram)


However, if you don't want to crop your photo and are ready to upload it, the next application I use is Whitagram. This is because Instagram works best for square-shaped photos. So unless you've cropped your photos into squares, if you were to upload a rectangular photo, it'll turn out to have black borders, which I personally find very ugly. With Whitagram, as implied by the name, it gives your rectangular photos a nice, white border which blends in seamlessly with the background of your Instagram feed. Of course, you can choose different colours for the border with this application, though I don't recommend that you do. More importantly, the reason why I always filter my photos first is because, if you were to filter your photo AFTER Whitagram, you'll be adding the effect of the filter to the white borders as well, which kind of defeats the whole purpose doesn't it???
(Typesetter)


If you're in the mood to be a
Above are the 2 photos that are now officially ready for Instagram :D On the left, you have your circle cropped, dreamy/whimsical photo with a popular quote that's been given a twist. On the right, you have a rectangular photo that has white borders (thanks to Whitagram) with an abstract, hipster phrase to match the hipster feel of the photo, LOL.
*please take whatever I'm writing in this paragraph with a
(美颜相机)


Everything I've explained so far works mostly for anything that you photograph, be it scenery, food, animals, objects etc. However, I do things a little bit differently when it comes to taking photos of people. Before I edit the photo on the VSCO application, I'll edit photos of people (or myself) on the 美颜相机 application. It's an application specifically for making you look better in your photos. You can smooth out your skin tone, lighten your eye bags, enlarge your eyes etc. You get the drift.
Okay, I decided to use another photo (from quite a while back) to better illustrate how this application works. I've also included a before and after photo; I think the most obvious difference is the much lighter eye bags in the edited photo.
-▴▴▴-
Before I sign off, I thought I'd leave everyone with some last few Instagram Dos & Don'ts.
1) Try not to make spelling or grammatical errors when inserting words into your photos.
2) Try not to use the filters provided by Instagram (they kind of suck), but if you do want to use the filters, try not to include the borders that comes with the filters.
3) Try not to flood other people's feed with like 20 billion photos at a go. Maybe compile it into a collage instead?
I hope this entry has been useful to those who are new to Instagram (surprisingly, there are still new users even though the application has been around for damn long) as well as eye opening for current users who never knew of the existence of certain, less popular applications :) Again, I'm no expert, so you don't have to agree with everything or anything I've said. Just sharing my own experience and some tips and tricks that I use that's all.
XOXO, T.
PS. Everything (excluding the 1st picture) in this entry is photographed & edited with an iPhone 4S.
PPS. Do follow me on Instagram if you're an Instagram user :) My username is @havocmama
PS. Everything (excluding the 1st picture) in this entry is photographed & edited with an iPhone 4S.
PPS. Do follow me on Instagram if you're an Instagram user :) My username is @havocmama
Labels: tutorials
written at 11:20